Tuesday, April 26, 2011

handprint flamingos & ostriches


Carrying on with our bird themed crafts this week, we made some handprint flamingos and ostriches.


 Unlike the peacock, these ones were very easy to do. And really the only difference between the two birds are the colours of the handprints.
 

 Just have your child stamp their hand on the paper, and then depending on the child's age, they may be able to help put the finishing touches on the birds. Now, I cut the legs out of paper, but you could just as easily draw some legs on the bird. Then just cut a small beak and add a googly eye and you're done! So simple.


I added a small piece of ric rac to the neck of the ostrich for the feathers. And there you have it- another quick and easy keepsake craft.

Linking up with: ABC and 123 Learning & Tatertots and Jello

Monday, April 25, 2011

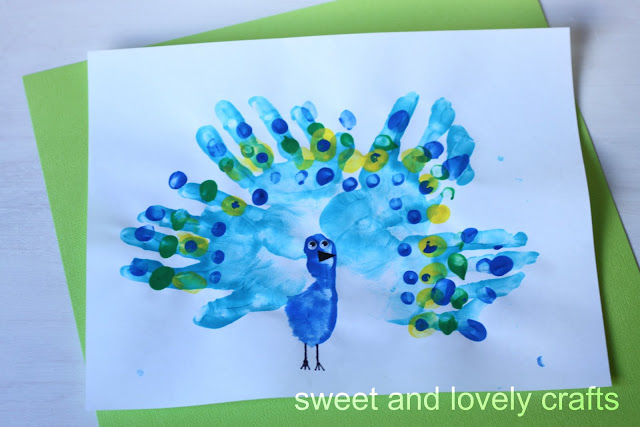
handprint peacocks


It's a sure sign that spring is on its' way when you start to see the return of robins (and other birds!) around here. We've been spotting lots of birds around here lately, so I decided to make some bird themed crafts with the kids. 

This craft was actually inspired by a craft that we saw on Mister Maker. It looked easy enough to make, so Claire and I gathered our supplies and sat down to try to make the craft. You know what's not so easy? Trying to get a three year old to do four blue handprints in a fan shape!


 However, we finally got one that turned out (and 4 that didn't!). After we had the handprints done, I painted Claire's thumb and part of her palm under her thumb to make the body of the peacock. Then I just let Claire go to town painting dots all over the peacock's tail. Add some googly eyes, a beak, and then draw on his feet.


 Join me here again tomorrow while I show off a few more bird crafts that we've made. You won't want to miss these ones!

Linking up with:   Tatertots and Jello & Skip to my Lou & ABC and 123 Learning

Monday, April 18, 2011

egg colouring

 Well, this was our Easter egg colouring weekend. I had a plan, but it didn't quite go as I had planned....


I had seen Martha do these eggs and I thought that they looked so pretty. Naturally I wanted to make some of them myself. I put long strips of electrical tape on pieces of wax paper. Then I cut the pieces of tape in half (lengthwise). I peeled off the pieces and wrapped them around the eggs.
Now I think that two major things went wrong here. Despite my best efforts, colour seeped under the tape :(
Also, I had picked up an egg colouring kit (I don't know why) and I wish that we would have just used regular 'ol food colouring. The colour was uneven and splotchy AND no matter how long we left them in the dye, they really didn't become very vibrant.


However, none of this really matter because Claire had loads of fun colouring the eggs, dropping them in the dye, and wrapping the tape on the eggs. Although her favorite part of colouring the eggs may have been that she was allowed to wash her hands and play with the water in the sink after we were all done. I don't know why we buy that child toys!

Linking up with: Skip to my Lou & ABC and 123 Learning & Tatertots and Jello

Thursday, April 14, 2011

big, bigger, biggest chicks

I just love making these little circle chicks (hard to tell, I know!) Claire has a Curious George book teaching her all about size progression. Naturally, I wanted to make her a craft so that she could practice putting these in order by herself, small, big, bigger, and biggest. I think that I may have made it too easy for her though- I should make two more and add smaller and smallest.

I guess that we'll just use the chick family as an Easter decoration, and maybe next year Simon will be putting them in order!


Linking up with:Tatertots and Jello & Somewhat Simple & Sun Scholars

Monday, April 11, 2011

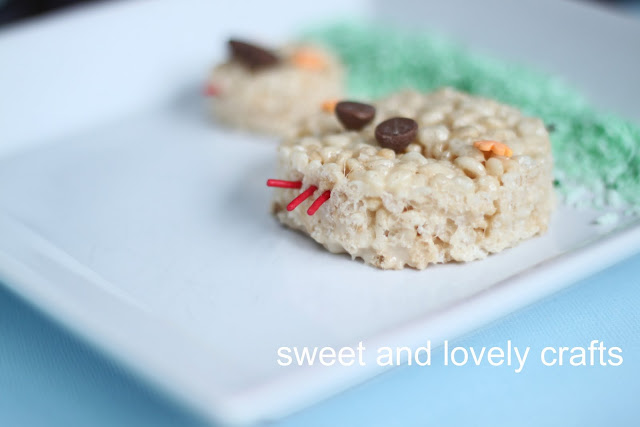
rice krispie chicks

 Looking for a quick and simple Easter treat? Look no further. These festive treats are so simple to make.

Just make a batch of Rice Krispie squares. The recipe is on the inside of every box, or you can find it here. I used just 5 cups of cereal though, because I find that 6 cups make them too hard to cut and eat. (You can't get a cookie cutter through the kind that needs 6 cups of cereal- not that I know that from personal experience or anything!)
Once the squares are done use your circle cookie cutters cut out a bunch of circles. I just used red sprinkles for the comb-y part of the chicken. Two chocolate chips for the eyes. Two flower sprinkles for its wings, and lastly, two chocolate sprinkles for its legs.
There you have it, a quick and simple Easter treat! Enjoy.


Friday, April 8, 2011

toilet paper roll bunnies


I wasn't going to post these- but then I decided I may as well post them. Good story eh? I'm not going to lie- the highlight of this craft for Claire (3 years old) was dumping the cotton balls out of the bag and then putting them into a container. That was of course until we broke out the glue...

What I like about this craft is the fact that we did it in two stages. One day Claire painted the paper that we used to cover the toilet paper rolls. The next day we added the ears, bunny face, and tail. Claire still has quite the wondering attention span, so frequent, smaller crafts work better with her!


We're working on some new hand print crafts to share with you next week.

Linking up with:Momnivores Dilemma & Sew Much AdoABC and 123 Learning & Sun Scholars & Tatertots and Jello & Designer Garden
Tuesday, April 5, 2011

happy spring

I am so ready for it to be spring here. We've had a few nice days, which give me some hope that spring's here, and then I hear the weather forecast. Snow tonight. Seriously? It's April. I just want the weather to warm up, the grass to become green, and the trees to bloom again. I want to go outside in t-shirts, draw hopscotches, and see the tulips grow. I don't think I'm asking too much of mother nature.

I'm bringing spring inside with this wooden sign that I made. I (as I've said before) love these pastel colours, they're so refreshing. If you're interested in the tutorial on how to make this sign, please look at this post.
 If this doesn't will spring to come, I'm going to need some other suggestions...

Linking up with:Tatertots and Jello & Sew Much Ado & Laugh Love and Craft & Somewhat Simple & WhipperBerry

Friday, April 1, 2011

Happy Birthday to...

me! Yes, no joke, today is my birthday. The big 3-0 and I'm excited about it. My twenties were good to me. I graduated university, got married and had two beautiful kids. I doubt I'll ever have such a productive 10 years again! I'm ok about that though. I'm looking forward to spending the weekend with my family, and I'll be back next week with some more Easter crafts! Happy weekend.- Lila
Related Posts Plugin for WordPress, Blogger...