Thursday, March 29, 2012

tissue Easter chicks


Claire loved making the shamrock tissue paper project so much that I wanted to think of a similar Easter project for her to make. What I love about this project is that she can do so much of it by herself. 

Supplies needed: 
small canvas (I bought mine at a dollar store)
paint (pink and orange)
tissue paper (yellow or orange)
paper scraps (yellow and orange) 
googly eyes
masking tape

 Using masking tape, tape off lines on the canvas. I used a piece of masking tape as a spacer. Then we squeezed some pink and orange paint onto a piece of tinfoil. I added a bit of white paint to each colour to make them a little lighter. Then Claire painted two pink lines and two orange lines on the canvas.

Once that was dry (which didn't take very long), I drew three circles on the canvas. I traced two different size container lids. Claire and I painted the inside of the circles with glue and then she glued balled up bit of tissue in the circles. (I cut the tissue paper into about 1 inch squares.)

Once the tissue circles were dry, we glued on eyes, beaks and legs. That's it. 

What sort of Easter crafts have you been making?

Monday, March 26, 2012

the painted iris (symmetry art)

When I came across this collage of painted irises I couldn't believe that they were painted by kindergartners. Almost immediately I set out to make this project with Claire (4 years old). 
They were so quick to make too!

Supplies needed: paint, paper, crayons, paint brush

 I poured purple paint into a container lid. Then I added a few blobs of white and blue. I found some purple paper that was the perfect colour for this project. Claire and I folded all of the paper in half. (We made a few, of course.) I drew a small C shape on half of the paper so that Claire would mostly keep the paint it there, see pic below. (I felt that she needed a bit of guidance, otherwise I'm pretty sure paint would have been everywhere.)

 She used a foam brush, dipped it in the paint, and then filled in the C shape. Then we folded over the paper and rubbed the paper to make sure all of the paint transferred.

Sadly, I didn't think to take any pics after all of our irises dried. But I gave Claire this iris and asked her to draw a long stem. Then I asked her to draw some leaves (you may have to  use your imagination here!) Then she used a yellow crayon and coloured in the middle of the flower. I just love how it turned out. It certainly adds a little something to our laundry room door, where it still hangs!

Tuesday, March 20, 2012

Easter craft ideas


1. thumbprint art- so easy to do with little ones!
2. Easter egg colouring
3. place tags- make these with simple chicks, or bunnies.
4. spring paper globes
5. Rice Krispie chicks
6. bunny bunting banner- say that six times fast
7. toilet paper roll bunnies
8. cupcake toppers

I just wanted to share some of my favorite Easter craft ideas from last year. I hate to think that I post all of these crafts and then they go to my archives to be forgotten. 

I also wanted to mention that I've created a facebook page for sweet and lovely crafts. I'd love to have you follow me on there. We all know that I'm not the most consistent blogger ever, and this way you won't miss any new blog posts. See you there!

Monday, March 19, 2012

fun Easter sandwiches


I am so excited that spring it finally on its way. I have been enjoying the bits of warmer weather here, and I'm ready for all of the snow to be gone until next winter! I decided to try making some fun lunches for my kids, after being inspired by the ones that Jill's makes on her blog. I just love the fun lunches that she creates for her kids.

The chick was so easy to make. It's based on one of my crafts from last year. I just used a circle cookie cutter to cut out the sandwich. I cut a marshmallow in half and stuck a chocolate chip to it to make the eyes. I cut small sticks of cheese for the legs, and made a little triangle cheese nose. I used my mini flower cookie cutter to cut a piece of bread and ham for the comb-y thing on top of the chickens head.


 I actually thought of this bunny sandwich around Valentines Day, when I created my puppy dog valentines. I used a heart cookie cutter to cut two hearts out of the sandwich. To make the ears, I just cut one of the hearts in half. I cut a piece of ham to go on top of the bunny ears. Once again, I cut a marshmallow in half and stuck a chocolate chip to it to make the eyes. I cut triangle out of cheese for the nose, and used a few chocolate sprinkles for the whiskers. That's it. These sandwiches only took a little bit longer to make and Claire loved them. I can't wait to think of some more fun lunches to make for her!

Monday, March 12, 2012

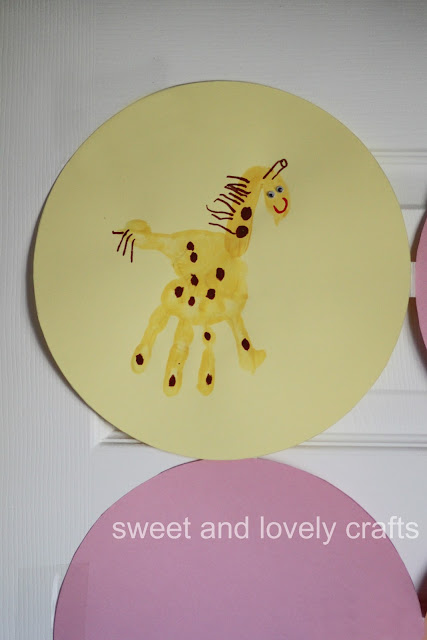
handprint giraffes

 This is the last of my giraffe related posts- I promise! We made these handprint decorations to cover the closet door behind the food table. (You can read all about Claire's giraffe themed party here.) They were an easy decoration to make, and an easy way to incorporate giraffes into the decorations.
 First add a bit of orange paint to the yellow paint, I just find that it makes the colour a little bit more bold. Then paint the hand of you child. Stamp on paper and let dry. Once dry I gave Claire a brown marker and asked her to draw the spots all over the giraffes. Then she drew some hair on the tail and on the neck. She drew the horn-like things on the giraffe's head (but apparently we forgot to draw the ears, whoops!) Claire used a red marker to draw the smile, and the glued on some googly eyes. 

That was it! So simple, and Claire loved doing it. And come on, who doesn't love handmade birthday decorations?!

Thursday, March 8, 2012

graham crackers- yum!


Remember these? These are the giraffe graham crackers that I made for Claire's birthday party. I mean, come on, when your daughter chooses a giraffe themed party you have to incorporate giraffes in any way that you can!

The kids love these crackers. I just made another batch for them. I'm going to double it the next time and try freezing a batch. These graham crackers are chewier than store bought ones, which are quite hard and crunchy, but the flavour is almost spot on.

Graham Crackers
(adapted from Haniela's Perfect Graham Cracker Recipe)

1 cup whole wheat flour
1 cup + 2 tbsp all purpose flour
1/3 cup + 1 tbsp brown sugar
¾ tsp baking powder
½ tsp baking soda
½ tsp salt
1 tsp cinnamon

6 tbsp butter, cubed

1/3 cup milk
2 tbsp orange juice
3 tbsp honey
1 tbsp maple syrup
1 tsp vanilla

Mix together whole wheat and white flours, brown sugar, baking powder, baking soda, salt and cinnamon. 
 

In separate bowl, stir together the milk, orange juice, honey, syrup, and vanilla.


Using a pastry blender (or two knives) add the cubed butter to the flour mixture. Once it has been cut in, pour in the milk mixture. Stir until combined. (I had to use my hands to finish mixing it all together.) If it seems really dry, just add a little more milk (or juice) until the dough comes together. Form into a ball, wrap in plastic, and chill for 30 minutes. 


Roll the dough out and poke all over with a fork. (I floured my countertop and the top of the dough.) Use cookie cutters to cut dough and place on a parchment (or foil) lined baking sheet. I used small cookie cutters, and mine needed to bake for 5 minutes at 350. Using small cookie cutters I was able to make about 120 cookies (40 per sheet). The small ones are perfect for the kids to snack on.

I'm pretty sure that my kids each ate about 20 crackers the first day that I made them. I love knowing what goes into the crackers that the kids are eating. What kind of snacks do you make for your kids to eat? I'm always looking for new snack ideas for my kids.

Monday, March 5, 2012

shamrock stamping


When I saw this toilet paper roll stamping project on Michelle's blog for Valentines day I knew that I wanted to try it with my kids. So I did. Unfortunately for me, Simon was more interested in smearing paint everywhere, immediately followed by putting his hands in his mouth. I've been a little hesitant to break out the paints again, but I was hoping that this time would be different. Lucky for me (must be that Irish luck!) it was.

I rolled out a long piece of white paper, and taped it to the floor. I squirted some green paint on some container lids (one for each of the kids) and gave them each a shamrock cookie cutter. The both did a great job stamping their shapes. After Simon had his shapes stamped he decided that it would look nicer as one big smear instead of discernible shapes.

The kids loved doing this and spent at least half an hour stamping and smearing. When involving a 1 1/2 year old in a project that involves paint, 30 minutes before nap time,  please make sure to MOVE their favorite-won't-go-to-sleep-without stuffed toys far far far away from the painting project. Otherwise, you may, or may not, end up doing a panic load of laundry, and delaying nap time for 30 minutes (or until the dryer is done.) That's just a note of caution for you, not that I actually know this from personal experience or anything :)

Related Posts Plugin for WordPress, Blogger...