Friday, May 27, 2011

ABC print


So, ages ago you may remember me posting about this number print that I made for Claire's room. You can read all about that here. As soon as I finished the number print (see pic below) I knew that I wanted to make an alphabet one to match it. So I went through my paper stash and picked out 26 pretty colors.


 I cut a snippet of each color so that I could have the paper arranged in the order that I wanted it in. Then I used my cricut, and 3 different cartridges, to cut out all of the letters. I played with the layout of the extra shapes on the print and in the end, I decided that less was more. I had quite a few shapes on the number print, but when I tried to add loads of shapes to the ABC print it just made it way too busy. So I picked out a few that didn't take away from the letters.

There you have it a piece of art for your little ones room. Customize the colors as you desire! I'd like to make one for Simon's room using blues and oranges. Have you made any art for your kids rooms? Leave me a link in the comments, I'd love to see it.


Linking up with: Sun Scholars & Tatertots and Jello &Skip to my Lou & Delicate Construction

Thursday, May 19, 2011

My Baby Turns 1!


A year old already?! I can't believe it. We hosted Simon's first birthday party at my Mom's house this past weekend. It was a small party, I just invited 3 of my friends, but with all of the kids we had 9 kids under the age of 5. That's a lot of kids :)


The theme for Simon's party was under the sea. Not everything turned out quite how I imagined- but Simon and his guests had a great time anyway! I used my cricut to cut out the banner and sea shapes. Luckily for me I have a friend who has every cricut cartridge that you could ever need, so I was able to borrow this sea themed one from her.


Inspired by the fish bowl gelatin that Martha made, I wanted to try to make it for Simon's party. However, I thought that it would be easier to just use blue jello. Um no- there's a reason Martha didn't suggest just using blue jello- you can hardly see the fish.


The cake wasn't quite what I had envisioned either. It was cute- but as it turns out I'm not so much a cake decorator, which lead to a few problems when I was trying to finish off the cake.


 I made each layer a different shade of blue/green for the under the sea theme.

I used this recipe to make my own goldfish starfish cheese crackers.

 We also made some fruit kabobs with some kiwi starfish. (As my sister was cutting out the stars from the kiwis she said "Uh Lila, you can add kiwi to the list of foods that cookie cutters aren't meant to cut.") But they looked great!


 I made apple carrot muffins which the kids loved- Simon especially.


When I saw these ruffled streamers on pinterest I knew that I wanted to make them for Simon's party. In fact, I'm already trying to think of more events that I can make ruffled streamers for.


 Claire loves twirling in her party skirt.


 Simon enjoying a piece of birthday cake- his first treat. (He did enjoy it, he was just a bit tired by the end of the party.)


Monday, May 2, 2011

red bird. blue bird


Oh dear- time got away from me last week. I meant to post this last week, but better late than never, I guess. This project was actually inspired by this craft, which uses potatoes to stamp the birds. Now, we actually tried making that craft but, we used small fingerling potatoes and I forgot to cut the potatoes in half. SO the birds ended up being huge, and the whole craft was a huge fail. Well- not entirely I guess, because it did spawn these adorable little note cards.


One of my favorite parts of this craft was the use of the corrugated cardboard. I cut a small bit of cardboard and then had Claire dip it in brown paint and stamp it on the card to create the tree for the birds. Then I just poured some red and blue paint so that Claire & Simon could stamp the cards with their thumbs.


Then when the paint was dry I added the googly eyes (of course!) and I added a few leaves for visual interest. The cards looked cute without the leave too, but I liked the punch that the green added. And there you have it, an all occasion note card.


Linking up with: Skip to my Lou & ABC and 123 Learning & Tatertots and Jello

Tuesday, April 26, 2011

handprint flamingos & ostriches


Carrying on with our bird themed crafts this week, we made some handprint flamingos and ostriches.


 Unlike the peacock, these ones were very easy to do. And really the only difference between the two birds are the colours of the handprints.
 

 Just have your child stamp their hand on the paper, and then depending on the child's age, they may be able to help put the finishing touches on the birds. Now, I cut the legs out of paper, but you could just as easily draw some legs on the bird. Then just cut a small beak and add a googly eye and you're done! So simple.


I added a small piece of ric rac to the neck of the ostrich for the feathers. And there you have it- another quick and easy keepsake craft.

Linking up with: ABC and 123 Learning & Tatertots and Jello

Monday, April 25, 2011

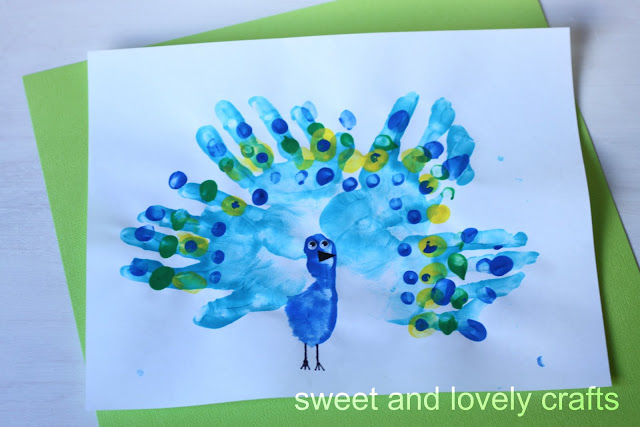
handprint peacocks


It's a sure sign that spring is on its' way when you start to see the return of robins (and other birds!) around here. We've been spotting lots of birds around here lately, so I decided to make some bird themed crafts with the kids. 

This craft was actually inspired by a craft that we saw on Mister Maker. It looked easy enough to make, so Claire and I gathered our supplies and sat down to try to make the craft. You know what's not so easy? Trying to get a three year old to do four blue handprints in a fan shape!


 However, we finally got one that turned out (and 4 that didn't!). After we had the handprints done, I painted Claire's thumb and part of her palm under her thumb to make the body of the peacock. Then I just let Claire go to town painting dots all over the peacock's tail. Add some googly eyes, a beak, and then draw on his feet.


 Join me here again tomorrow while I show off a few more bird crafts that we've made. You won't want to miss these ones!

Linking up with:   Tatertots and Jello & Skip to my Lou & ABC and 123 Learning

Monday, April 18, 2011

egg colouring

 Well, this was our Easter egg colouring weekend. I had a plan, but it didn't quite go as I had planned....


I had seen Martha do these eggs and I thought that they looked so pretty. Naturally I wanted to make some of them myself. I put long strips of electrical tape on pieces of wax paper. Then I cut the pieces of tape in half (lengthwise). I peeled off the pieces and wrapped them around the eggs.
Now I think that two major things went wrong here. Despite my best efforts, colour seeped under the tape :(
Also, I had picked up an egg colouring kit (I don't know why) and I wish that we would have just used regular 'ol food colouring. The colour was uneven and splotchy AND no matter how long we left them in the dye, they really didn't become very vibrant.


However, none of this really matter because Claire had loads of fun colouring the eggs, dropping them in the dye, and wrapping the tape on the eggs. Although her favorite part of colouring the eggs may have been that she was allowed to wash her hands and play with the water in the sink after we were all done. I don't know why we buy that child toys!

Linking up with: Skip to my Lou & ABC and 123 Learning & Tatertots and Jello

Thursday, April 14, 2011

big, bigger, biggest chicks

I just love making these little circle chicks (hard to tell, I know!) Claire has a Curious George book teaching her all about size progression. Naturally, I wanted to make her a craft so that she could practice putting these in order by herself, small, big, bigger, and biggest. I think that I may have made it too easy for her though- I should make two more and add smaller and smallest.

I guess that we'll just use the chick family as an Easter decoration, and maybe next year Simon will be putting them in order!


Linking up with:Tatertots and Jello & Somewhat Simple & Sun Scholars

Related Posts Plugin for WordPress, Blogger...