Showing posts with label Easter. Show all posts

Tuesday, April 15, 2014

Easter lunches


My kids are getting so excited for Easter. At six years old I'm surprised that Claire has already figured out that I'm the Easter Bunny, but she still expects a little egg hunt this year! I've made a few Easter lunches for Claire which she has really been enjoying.

I made a Wowbutter sandwich on some oatmeal brown bread that I made. I added an Easter sticker to the top of her applesauce, a bunny ring to her container of grapes and some Annie's bunny crackers for a snack.

I picked up this new bunny cutter this year at Target (love that Target's in Canada now!) complete with a bunny tail. I added in a few grapes and bunny pick, some sugar cookies we made and a green apple.

More Wowbutter sandwiches cut into small flowers. An apple, some blueberries and a few chocolate Easter eggs in a pink plastic egg.

 This was her favorite lunch! The plastic eggs were filled with strawberries, blueberries, grapes and Annie's crackers. I cut her sandwich into small pieces and added them in the smaller compartments. I put a few chocolate eggs in there as well.

I used a heart shaped cookie cutter to make the bunny sandwich. Grapes, blueberries and strawberries were added to the lunch as well. I took the label off her Yop and drew a little bunny face on it. Drawing's not really my strong point :)

These lunches, along with all of my other ones, are packed in the fabulous EasyLunch Box containers that we love.

Thursday, March 28, 2013

Easter egg lunch

I hosted a little Easter lunch this week for Claire and Simon. I invited one of my good friends whose kids are the same age as my kids. I love planning parties, and waiting from Claire's birthday in February and Simon's birthday in May is way to long not to plan a fun get together for the kids. 

I of course did not come up with this idea of putting food in Easter eggs, but I think that it's brilliant. The kids LOVED their Easter egg lunch. The great part is that you can use whatever you have on hand. I stuffed mine with blueberries, strawberries, grapes, clementines, cheese, and small bits of sandwiches.
 See! He loved it. First thing that Simon did was open every egg and try to see how many had clementines in them.
I also included a joke with each egg lunch for the kids. I used the jokes found here at I Heart Naptime.
 Since I knew that I would need to keep the kids entertained while Sylvia and I made the lunches, I printed out quite a few colouring and activity sheets for the kids to do. My kids love colouring, so this did keep them occupied for quite a while. I used colouring sheets from Style Me Gorgeous and Disney Spoonful. I also had some Easter stickers on hand for when colouring alone got a little boring for them. 
 I covered my tea party table with kraft paper, and added a little washi tape to add some colour. Check out Jillian's post and see the sweet Easter party that she did for her kids. 
 Sylvia made these Easter basket cupcakes for the kids after lunch. She used chocolate chip cookie dough that she pressed into a mini muffin tin. Then she put some icing on top of them, followed that by some shredded coconut. She topped the baskets with a few eggs (jelly beans) and then made basket handles from pipe cleaners.
 Lastly, I printed this banner from Sandy Toes and Popsicles last year, and hung it up again for our lunch this year.
The kids had a great time at the lunch. It was so cute to see how each child had their own approach to opening and eating their eggs.

Who else has super excited children, just waiting for the Easter Bunny to come?

Tuesday, April 3, 2012

fun Easter lunches: part 2

 Claire enjoyed the last lunches that I made for her so much, that I decided to try making a few more for her. She loved the butterfly lunch. I made a ham and cheese sandwich and then used a heart cookie cutter to cut out four hearts. Since I've recently discovered that Claire loves eating raw carrots with ranch dip, I served this lunch with carrot sticks. I used one stick for the middle of the butterfly. To make the antennas, I ran the carrot peeler down the edge of a carrot stick. Then I cut it in half to make the two antennas. The eyes are marshmallows cut in half with chocolate chip eyes (her favorite part of lunch). I used my small flower cookie cutters to cut the cheese, and then added carrot stick stems.

 
Claire liked her bunny sandwich so much that I decided to redo it in pancake form. This was so simple to make too! I just made two regular circle pancakes, and then cut them with my heart cookie cutter once they were cooked. I cut one of the hearts in half for the ears. I used marshmallows for the eyes, and teeth. I used a pink M&M for the nose. I did use the syrup do draw a smile, but it's hard to see in the pic. That doesn't really matter though, as soon as she sat down to eat she requested there be more syrup anyway!


Don't remember the first set of lunches I made? Check them out here.

Monday, April 2, 2012

Easter crackers


Everyone loves these crackers at Christmas time, so I thought that it would be nice to have some for the kids to do this Easter. It would look nice to have one at each place setting with Easter dinner. They didn't take very long to put together either.

Supplies needed:
crepe paper, the long wide sheets of it (I got mine at the dollar store)
crepe paper, regular streamer size (I used leftover streamers from Claire's party)
toilet paper rolls
decorative Easter stickers (I used foam ones)
double sided tape
toys (see next pic)
Easter jokes (I printed ones from the Happy Home Fairy, I love her blog!)


I just picked up a few things that I thought the kids would like in their crackers. Claire's obsessed with glitter glue, which means Simon loves it too. If you're making these with small kids (under the age of three) it's probably not a good idea to add the sponges that grow in water. I was supervising the kids with these, and they loved watching them grow.  It's not a cracker unless it's got a joke in it. So be sure to check out the ones that I used at Happy Home Fairy. I included a few chocolate eggs in each one as well.


They're so simple to make. Pick up one of each item, lay them on top of the joke, and then slide them into the toilet roll. Cut a sheet crepe paper to be about 12x17 inches. Roll the toilet roll up in the crepe paper, and place a piece of double sided tape to keep the crepe paper in place at the end. Then twist the ends of the roll. 


I embellished mine with leftover ruffled streamers from Claire's birthday, but they didn't really have the ruffled look that I was hoping for. To keep them ruffled, made them too loose, so I ended up pulling them tight. The moral of this is, don't worry about using ruffled streamers. You could just layer streamers, or use a piece of patterned paper. I added a foam sticker and that's it! 

These really would make a delightful addition to any Easter meal.


Thursday, March 29, 2012

tissue Easter chicks


Claire loved making the shamrock tissue paper project so much that I wanted to think of a similar Easter project for her to make. What I love about this project is that she can do so much of it by herself. 

Supplies needed: 
small canvas (I bought mine at a dollar store)
paint (pink and orange)
tissue paper (yellow or orange)
paper scraps (yellow and orange) 
googly eyes
masking tape

 Using masking tape, tape off lines on the canvas. I used a piece of masking tape as a spacer. Then we squeezed some pink and orange paint onto a piece of tinfoil. I added a bit of white paint to each colour to make them a little lighter. Then Claire painted two pink lines and two orange lines on the canvas.

Once that was dry (which didn't take very long), I drew three circles on the canvas. I traced two different size container lids. Claire and I painted the inside of the circles with glue and then she glued balled up bit of tissue in the circles. (I cut the tissue paper into about 1 inch squares.)

Once the tissue circles were dry, we glued on eyes, beaks and legs. That's it. 

What sort of Easter crafts have you been making?

Tuesday, March 20, 2012

Easter craft ideas


1. thumbprint art- so easy to do with little ones!
2. Easter egg colouring
3. place tags- make these with simple chicks, or bunnies.
4. spring paper globes
5. Rice Krispie chicks
6. bunny bunting banner- say that six times fast
7. toilet paper roll bunnies
8. cupcake toppers

I just wanted to share some of my favorite Easter craft ideas from last year. I hate to think that I post all of these crafts and then they go to my archives to be forgotten. 

I also wanted to mention that I've created a facebook page for sweet and lovely crafts. I'd love to have you follow me on there. We all know that I'm not the most consistent blogger ever, and this way you won't miss any new blog posts. See you there!

Monday, March 19, 2012

fun Easter sandwiches


I am so excited that spring it finally on its way. I have been enjoying the bits of warmer weather here, and I'm ready for all of the snow to be gone until next winter! I decided to try making some fun lunches for my kids, after being inspired by the ones that Jill's makes on her blog. I just love the fun lunches that she creates for her kids.

The chick was so easy to make. It's based on one of my crafts from last year. I just used a circle cookie cutter to cut out the sandwich. I cut a marshmallow in half and stuck a chocolate chip to it to make the eyes. I cut small sticks of cheese for the legs, and made a little triangle cheese nose. I used my mini flower cookie cutter to cut a piece of bread and ham for the comb-y thing on top of the chickens head.


 I actually thought of this bunny sandwich around Valentines Day, when I created my puppy dog valentines. I used a heart cookie cutter to cut two hearts out of the sandwich. To make the ears, I just cut one of the hearts in half. I cut a piece of ham to go on top of the bunny ears. Once again, I cut a marshmallow in half and stuck a chocolate chip to it to make the eyes. I cut triangle out of cheese for the nose, and used a few chocolate sprinkles for the whiskers. That's it. These sandwiches only took a little bit longer to make and Claire loved them. I can't wait to think of some more fun lunches to make for her!

Monday, April 18, 2011

egg colouring

 Well, this was our Easter egg colouring weekend. I had a plan, but it didn't quite go as I had planned....


I had seen Martha do these eggs and I thought that they looked so pretty. Naturally I wanted to make some of them myself. I put long strips of electrical tape on pieces of wax paper. Then I cut the pieces of tape in half (lengthwise). I peeled off the pieces and wrapped them around the eggs.
Now I think that two major things went wrong here. Despite my best efforts, colour seeped under the tape :(
Also, I had picked up an egg colouring kit (I don't know why) and I wish that we would have just used regular 'ol food colouring. The colour was uneven and splotchy AND no matter how long we left them in the dye, they really didn't become very vibrant.


However, none of this really matter because Claire had loads of fun colouring the eggs, dropping them in the dye, and wrapping the tape on the eggs. Although her favorite part of colouring the eggs may have been that she was allowed to wash her hands and play with the water in the sink after we were all done. I don't know why we buy that child toys!

Linking up with: Skip to my Lou & ABC and 123 Learning & Tatertots and Jello

Thursday, April 14, 2011

big, bigger, biggest chicks

I just love making these little circle chicks (hard to tell, I know!) Claire has a Curious George book teaching her all about size progression. Naturally, I wanted to make her a craft so that she could practice putting these in order by herself, small, big, bigger, and biggest. I think that I may have made it too easy for her though- I should make two more and add smaller and smallest.

I guess that we'll just use the chick family as an Easter decoration, and maybe next year Simon will be putting them in order!


Linking up with:Tatertots and Jello & Somewhat Simple & Sun Scholars

Monday, April 11, 2011

rice krispie chicks

 Looking for a quick and simple Easter treat? Look no further. These festive treats are so simple to make.

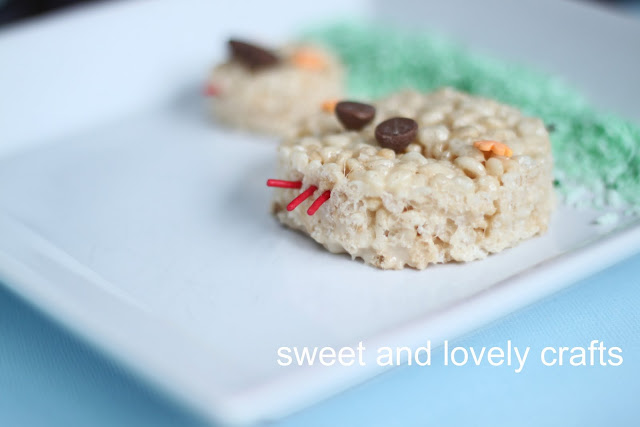
Just make a batch of Rice Krispie squares. The recipe is on the inside of every box, or you can find it here. I used just 5 cups of cereal though, because I find that 6 cups make them too hard to cut and eat. (You can't get a cookie cutter through the kind that needs 6 cups of cereal- not that I know that from personal experience or anything!)
Once the squares are done use your circle cookie cutters cut out a bunch of circles. I just used red sprinkles for the comb-y part of the chicken. Two chocolate chips for the eyes. Two flower sprinkles for its wings, and lastly, two chocolate sprinkles for its legs.
There you have it, a quick and simple Easter treat! Enjoy.


Friday, April 8, 2011

toilet paper roll bunnies


I wasn't going to post these- but then I decided I may as well post them. Good story eh? I'm not going to lie- the highlight of this craft for Claire (3 years old) was dumping the cotton balls out of the bag and then putting them into a container. That was of course until we broke out the glue...

What I like about this craft is the fact that we did it in two stages. One day Claire painted the paper that we used to cover the toilet paper rolls. The next day we added the ears, bunny face, and tail. Claire still has quite the wondering attention span, so frequent, smaller crafts work better with her!


We're working on some new hand print crafts to share with you next week.

Linking up with:Momnivores Dilemma & Sew Much AdoABC and 123 Learning & Sun Scholars & Tatertots and Jello & Designer Garden

Wednesday, March 30, 2011

cupcake toppers and more!

 Not sure what to do with the chicks and bunnies that I made earlier in the week? Don't want them just hanging out in a bucket or jar? No problem. I've come up with a few other ways that you could use them. Use them as cupcake toppers. It's a fast and easy way to decorate those cupcakes for Easter.

 The next few ideas would be especially great if you're having an Easter brunch or get together. I used the bunny to make a bag topper for this bag of treats. The best part is that it seriously took less than three minutes to make. I just cut a scrap of purple paper and folded it in half. I cut a piece of ribbon and glued it on the the paper. Then I used 2 pop up dots to secure the bunny to the paper. Now, had I been able to find my stapler I would have stapled it onto the bag, but instead I just used tape.

Claire really liked this idea and it was probably the easiest one yet. I just punched a hole on the top and bottom of the chick and threaded the straw through the holes. Chocolate milk anyone?


How about using the chicks and bunnies to make some place cards for brunch. Who wouldn't like these? I used pop up dots to secure the bunny and chick onto these cards too. I also used some old rub ons that I had hanging around my stash to write the names.


Linking up with:Skip to my Lou & Be Different Act Normal & Somewhat Simple & Tatertots and Jello & So You Think You're Crafty & Sun Scholars

Monday, March 28, 2011

chicks and bunnies

 
Some of my favorite crafts to make are ones that I don't have to make a trip to the craft store for. Granted I had picked up these pails a while ago at Michaels (for just $0.75) and I knew that I could use them for something!

 I kind of cheated, and I used my cricut to cut out the bunnies. I think that they look pretty cute though.

 But the chicks- the chicks were inspired by Bakerella's Spring Chicken cake pops. I just love how they turned out. And they were so simple to make. I cut out a circle (about 1 1/2 inches). I added googly eyes, and cut a small triangle from a scrap piece of cardstock for the nose. I had these flower sequins that I bought ages ago that I used for the feet, although any sequins would look cute. The comb on the head was actually a vellum flower that I also had in my stash. Obviously you could just cut this out of cardstock.


There you have it. The perfect little decorations for Easter. I put sheet of tissue paper in the bottom of the pail so that the skewers would stand up. Yes, I know floral foam would have worked just as well- but I was all about not having to go to the store for this craft!

Stay tuned for more Easter craft ideas with the chicks and the bunnies later this week.

Linking up with : Sew Much Ado & Somewhat Simple & Sun Scholars & Tatertots and Jello & ABC and 123 Learning & Skip to my Lou
Related Posts Plugin for WordPress, Blogger...