Showing posts with label footprint/handprint/thumbprint art. Show all posts

Friday, January 30, 2015

superman valentines


 Lately my kids have been interested in Super Heroes. My kids can list off a huge list of them (some that I had to verify were real ones like Dr. Octopus, or something like that.) So I thought that it would be cute if we made Superman valentines. Simon helped me make these since Claire was at school and I think that he did a great job. I'm hosting a little play date for Simon and his friends the day before Valentine's day (while Claire's at school celebrating) and I thought these would be perfect for him to give to his friends.

Supplies:
Cardstock (I used white)
Paint (blue and whatever colour you want to make the face, I mixed white and brown)
Markers (red, yellow, blue and black)
Googly eyes (optional)

I cut the paper into rectangles measuring 3x4inches. Simon dipped his thumb into the cream(ish) colour paint and pressed it firmly onto the card. He did all of the cream coloured thumbprints and then did all of the blue ones right next to them. Once the paint was dry I used the markers to finish embellishing the cards. I used the blue to draw the arms and legs and black for the hair. (Yes, I'm aware that there will come a point where my children far surpass my artistic (ha!) abilities.) Then I used the red marker to draw a smile and a the outline of the cape. I used the yellow marker to draw a diamond like shape on the cape which I coloured in yellow. Then I finished colouring in the cape. I added a few stars as well. To finish Superman I glued on some small googly eyes.

Then I tried to think of something clever to write on the valentine. I googled Superman's catch phrases, but Superman didn't give me much to work with :) He does say up, up and away, hence the use of that on the card. Simon signed all of his cards and now they're ready for him to pass out to his friends, so that when his sister comes home with  a bag of valentines, he will also have one!

Wednesday, November 27, 2013

footprint Santa & Rudolph

I love Christmas crafting. Surprise! This is one of my favorite crafts because one footprint is Claire's and one is Simon's. I love that the project incorporated both of them on the same paper.

To make the Santa, I paint the heel of Claire's foot cream colour and the rest of her foot red. Then I painted Simon's foot brown and stamped it next to Claire's footprint. Note: When you're doing this try to make sure you line up the toes of the footprints, otherwise you'll end up making stairs for Santa and the reindeer to walk up :) After I stamp their feet on the paper I have a face cloth right next to me to wipe the paint off of their feet. I always use Crayola paints and it wipes right off. We usually head up for a bath shortly after these projects so that I don't have to worry about getting all of the paint out in between their toes.

Once the paint was dry I started to create the reindeer. I used a brown Crayola marker to draw antlers, ears, arms, and a tail. I used a red marker to draw boots and a smile and a blue one to dry a hat. I added some googly eyes and a sequin for the nose, it is supposed to be Rudolph after all. Then I cut up some patterned paper so that Rudolph could carry some presents. Now while I think that the reindeer looks wonderful, Claire (she's 5) feels like he's not authentic. "Mommy, Rudolph doesn't wear boots or a hat and he DOESN'T carry presents. That's Santa's job." So maybe consult your little ones as to whether Rudolph wears boots and a hat :)

For Santa, I used a black marker to drawn Santa's boots, belt and nose. I used a red marker to draw Santa's hat, smile and arm. I drew his mitten and toy bag with green markers. I glued a sequin on Santa's belt and added some googly eyes. Then I ripped apart a cotton ball to make Santa's beard, the fur on the top of the hat and the ball on the end of the hat.


Thursday, October 24, 2013

thumbprint witch


So a couple of years ago Claire and I made the footprint witch craft. This year we made a thumbprint witch.

What you need:
Card stock- I used white card stock cut into 3x4 inches (hello project life insert cards)
Cream and white coloured paint
Markers
Googly eyes (optional)

Have your child stamp their thumbprints on the card stock, one on top of the other one. See picture below.


Once the paint is dry, you can start to decorate it. I started by drawing the broom. Then I used the black marker to draw the witch's arms, legs, and hat. I added some stars and hair using yellow marker. I used a fine tip marker to draw the smile and nose. I finished it off with some googly eyes. There you have it. An adorable Halloween card or a super cute Halloween project life insert :)

Wednesday, October 23, 2013

footprint scarecrow

It's been a while since I came up with a hand print/foot print craft. This was inspired by some fall clip art that I came across on pinterest. Check out the inspiration here.

This was a simple craft to make since I just had Claire paint and stamp her foot, and then I added on the details. She painted her heel and toes a cream colour and the rest of her foot green. She stamped it on a piece of 12x12 white cardstock.

Once that was dry, I drew on the details, which I did using the kids Crayola markers.  I started by using a dark brown marker to draw the post that goes from the feet into the ground. Then I used it to draw the hat. I used an orange marker to draw the arms and a light brown one to draw the broom handle.  I used a light and dark yellow marker to draw all of the straw coming out of the scarecrow. I drew a little face and some small patches on the scarecrow body.

Happy Fall!

Wednesday, August 14, 2013

handprint paper


Day 3 of back to school crafts!! You might have to think outside of the box for this one :)
I was trying to think of all of the things that are related to school, and of course you can't go to school without paper- hence the handprint paper. 

Paint the hand white and stamp it onto a piece of paper. (I chose blue.) Once the paint is dry use a blue pen to draw the lines on the page. I used a popsicle stick as a spacer for my lines. Draw the circles for the holes in the paper. Most importantly, use a red pen to draw the vertical line on the page.

It doesn't get any easier than that. I'll be back tomorrow with another school themed craft. 


Monday, August 12, 2013

handprint crayon box!

I'm baaaaccccckkkkkk!!! Once again, I'm feeling inspired and refreshed. I've been enjoying this summer with my kids. Claire starts school in less than a month. She's ready, but I'm not sure if I'm ready for her to start school. Not having been to daycare/preschool I hope that I've given her a good foundation for school. We sat down the other day and came up with a list of foods that would be good to pack in her lunch. I'm already planning a little photo shoot at her school to get some school photos of Claire. It's just hard to believe that this time is here already!

I'm kicking off this week with a full week of school themed crafts!! Yes, a whole week of blog posts!! I know, you'll believe it when you see it. Me too.

The first one is a hand print box of crayons. Is there a more iconic symbol of school? (Possibly... check back later in the week to see what other crafts we did.) This craft however, was so easy to do. 

Materials needed:
Yellow paint, and 5 other colours of your choosing
Paper (cardstock)
Thin black pen
Thick black pen (or small sticker letters/cricut/silhouette letters)

Paint the palm of the hand yellow (I mixed in a but of orange with the yellow, just so that it's a little darker.)
The paint each finger a different colour- I let Claire pick the colours. Once that's dry, use a thin black pen to write the colours of each crayon on the fingers. If you have a thick black pen, you can use that to write the word crayons on the palm of the hand. I used my cricut to cut the letters as small as I could, and then glued them on the hand print craft. That's it!

I would love for you guys to follow me on facebook so that you don't have to miss any of my sporadic posts! You can find me on pinterest here.


Linking up with: Six Sister's Stuff &  Skip to my Lou & Weekly Kids Co-op & Flamingo ToesTatertots and Jello 


Monday, July 1, 2013

Thumbprint beaver

 It's Canada Day, and I should be hosting a Canada Day party for the kids but it has been raining here for what seems like ever now. The party was supposed to be on Saturday, but then this was the forecast. As 
 you can see it hasn't changed much since Sat. I am ready to see the sun. At least the kids won't care that the Canada Day party will be a week after Canada Day.

The kids and I made this sweet little Canada Day craft this weekend. I just started project life (it just came to Michaels stores here) and this will be a perfect craft to include in it. 

Materials needed:
brown paint
black pen & brown marker
googly eyes (optional)
piece of red paper to mount the leaf on
scissors
glue

Cut out a maple leaf, using the template link above, or draw your own leaf if you're artistically inclined at all. Have the child dip their thumb in brown paint, and stamp it twice, one on top of the other, on the maple leaf.
Once that's dry, using a brown marker, dry on little ears, legs and a tail. I used a black pen to make the x's on the tail, and draw the arms and face. Glue on googly eyes, if you're using them. I mounted the leaves of a piece of 6x4 red cardstock, because I wanted it to fit in my project life album. You can of course choose whatever size paper you want to use to mount the maple leaf. That's it. Be sure to date your project, so you can remember how little those thumbprints used to be!

Happy Canada Day!

Linking up with:   Skip to my Lou

Friday, March 1, 2013

St. Patrick's Day thumbprint art

I am so excited to post this project. We actually did this project a little while ago, but because it was Claire's birthday last week, it took me a little while to get around to finishing it off! I have made similar thumbprint art in the past (Easter and Halloween), but this one was simplified big time!

Supplies needed:
template
cardstock to print the template on
light green cardstock to make the thumbprint art on
washi tape or patterned paper
paint (green, orange, cream, black, red, yellow, blue, purple)
picture frame
paper trimmer
black and green markers (or pens)
2 googly eyes
gold paper, hole punched (or sequins, or yellow paper)
glue

 Print out the template on a nice heavy weight cardstock.

Cut out the pieces of light green cardstock into 2x3 inch pieces.

Grab your paint and start making the thumbprints.

To make the leprechaun have your child stamp a green thumbprint, and and orange one right below the green one. Once the orange paint is dry, have the child stamp a cream fingerprint on top of the orange paint. Once that's dry, add the googly eyes, smile, black line on the hat, and small piece of gold paper, or sequin.

To make the pot of gold have your child stamp a black thumbprint. Once that's dry, you can add your gold. Use whatever you have on hand to make the gold. I had a piece of gold paper, so I used a hole puncher to punch out circles of paper for the gold. You could use yellow paper, sequins or tin foil.

To make the shamrock stamp three thumbprints in a shamrock shape. Draw on the stem when the paint is dry.

To make the rainbow very lightly draw a rainbow shape with a pencil. This will be very helpful if you have a child who already knows how to do the project, even before you explain it to them. (Guess which kind of child I have??) Make sure you draw it very lightly, because it will show through the paint if it's at all dark. Stamp one thumbprint of each color. 
To assemble the whole project: Cut the template to fit your picture frame, 8x10 inches. (My frame was from the dollar store.) Put a piece of washi tape just above the St. Patrick's Day lettering. Use a piece of green patterned paper if you don't have washi tape. Using double sided tape, stick on the leprechaun, gold, shamrock and rainbow. I used another piece of washi tape to tape the pieces on the template.

Click on the picture to download the template.

Linking up with: Six Sister's StuffSkip to my Lou & Tip Junkie & Weekly Kids Co-op & One Artsy Mama & Tatertots and Jello  - See more at: http://sweetandlovelycrafts.blogspot.ca/#sthash.xxMbVt4h.dpuf

Linking up with: Six Sister's StuffSkip to my Lou & Tip Junkie & Weekly Kids Co-op & One Artsy Mama & Tatertots and Jello  - See more at: http://sweetandlovelycrafts.blogspot.ca/#sthash.xxMbVt4h.dpuf
- See more at: http://sweetandlovelycrafts.blogspot.ca/#sthash.xxMbVt4h.dpuf
Linking up with: Six Sister's StuffSkip to my Lou & Tip Junkie & Weekly Kids Co-op& One Artsy Mama  & Tatertots and Jello  - See more at: http://sweetandlovelycrafts.blogspot.ca/#sthash.OlBr8ndi.dpuf

Monday, January 14, 2013

Footprint Race Car Valentine!

In an attempt to create a more boyish Valentine, Simon and I created the footprint race car. If we're being technical here, Simon begrudgingly let me paint his foot and sort of let me press it on the paper. Last year we created the footprint dump truck (Simon was slightly more agreeable last year!)

This one was fairly easy to make, once the child's footprint had been done. I used red paint, slathered the paint all over Simon's foot (he was sitting a chair), and then stood him up and pressed his foot on the paper. Make sure not to have too much paint on the foot, or it will just slide around too much when the child steps on the paper.

Once the paint is dry you can add in some of the extra details. Use a black marker to draw the road lines (hopefully yours will be slightly more parallel than mine.) Draw some wheels, the number on the car, and then the finish line sign. I used a green marker to add some grass (I just wanted to add a little colour). I couldn't find a red marker, so I used my red felt tip pen to add the spoiler thing on the back of the car. I drew (sort of!) a person inside the car with felt tip pens as well. Then just write you Valentine message on the top of the paper.

My plan is to scan this project, and print out some copies that we can send to Simon's Grandparents.

Am I the only one working on Valentine projects already? Let me know what you've been working on, I'd love to check it out. Leave the link in the comments.

Linking up with: Six Sister's StuffSkip to my Lou & Tip Junkie & Weekly Kids Co-op & Tatertots and Jello 

Tuesday, January 8, 2013

thumbprint Valentine bookmarks: part 2

Longtime blog readers may remember the thumbprint bookmarks that Claire and I made last year for Valentine's Day. Turns out, they were one of my most popular posts ever. So, I decided to make a few new ones for this year. If you're new to my blog, I'd love for you to follow me on my facebook page.

For these ones, I choose a fruit theme. (I have another set that I'll be posting shortly.) These are so easy to make, and aside from the drying time for the paint, they hardly take any time at all.

To Make:
Coloured cardstock.
ribbon
paint
decorative tape
corner punch (optional)
coloured pens/markers

To start, I cut my 12x12 paper in half, and then cut the bookmarks to measure 2"x6".
Decide what fruit you'd like to create, and have your child stamp their thumb on the bookmark.
Once dry, embellish the fruit with stems & leaves. I used some coloured pens to write the puns on the bookmarks.

I finished off the bookmarks by adding some washi tape to the top of the bookmark, and rounding the corners. Lastly, I punched a hole on top of the bookmarks, and folded a bit of ribbon through the hole.

You can have your child write the names of the lucky recipients of these bookmarks on the back of them.


Friday, June 29, 2012

handprint beavers


It's nearly Canada Day, and I couldn't let it pass without doing a craft with the kiddos. This was a fun craft, and the kids loved  doing it. It has been a while since we last painted, so they had fun making a HUGE mess painting. Did you know that the beaver is the national animal of Canada?

Claire used some maple leaf cookie cutters to stamp leaves on the white paper. We let those dry over night. This morning, Simon and Claire painted their hands brown and stamped them on the paper. While we still had the brown paint out, I added little feet and little ears to the beaver. Then when it was all dry I drew the hands, nose, mouth (big teeth are key) and the details on the tail.

Whenever I do painting projects with the kids I always get them to do what I have in mind first ( in this case brown handprints). Then I let them paint whatever they want (including themselves!) If I waited until they were nearly done painting, there would be a lot less cooperation with me.

We're making cookies this weekend to take to the teddy bear picnic on Canada Day. The kids are so exited. Who else has big plans for Canada Day?


Linking up with: Six Sister's Stuff & Today's Creative BlogSkip to my Lou & Tip Junkie & Tatertots and Jello

Monday, March 12, 2012

handprint giraffes

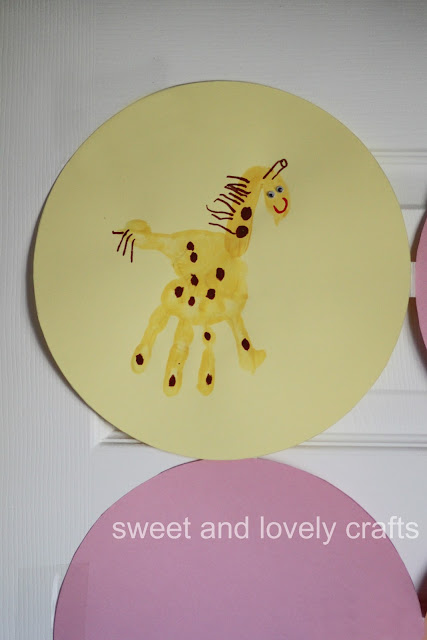
 This is the last of my giraffe related posts- I promise! We made these handprint decorations to cover the closet door behind the food table. (You can read all about Claire's giraffe themed party here.) They were an easy decoration to make, and an easy way to incorporate giraffes into the decorations.
 First add a bit of orange paint to the yellow paint, I just find that it makes the colour a little bit more bold. Then paint the hand of you child. Stamp on paper and let dry. Once dry I gave Claire a brown marker and asked her to draw the spots all over the giraffes. Then she drew some hair on the tail and on the neck. She drew the horn-like things on the giraffe's head (but apparently we forgot to draw the ears, whoops!) Claire used a red marker to draw the smile, and the glued on some googly eyes. 

That was it! So simple, and Claire loved doing it. And come on, who doesn't love handmade birthday decorations?!

Monday, January 23, 2012

footprint dump truck carrying love


Are you looking to send an extra special Valentine to someone this year? Maybe Grandma, Grandpa, or even a teacher? Then this is it! It's a footprint dump truck, carrying an extra special load of love.

This was a very easy craft to make. I painted the kids feet yellow (I mixed in a bit of orange so that the yellow would be easier to see) and stamped them on the paper. Then once the paint was dry, Claire and I set out to finish off our trucks. We drew on our windows and wheels on the truck. (Some of us have different visions of what windows look like.)

Then I cut a piece of brown paper (because that dump truck is working hard pulling that load of love up the hill) and glued it underneath the truck.We drew some grass on the hill, and then set out to fill up the dump truck. Claire can't (or won't) draw hearts yet, so we used an old heart punch that I have to cut hearts out of paper. She had a great time gluing them on the truck.

If you don't have a heart punch, or your child knows how to draw hearts (!) then the footprint dump truck looks just as adorable with the hearts drawn in.

 So, get out the paint and paper, and set to work to surprise someone with one of these special Valentines this year. And if you do make these, let me know. I'd love to see how yours turn out!
 
   
Linking up with: Skip to my Lou & The Grant Life & An Original Belle& Michelle Paige & Tip JunkieTatertots and Jello

Wednesday, January 11, 2012

bee mine Valentine

Looking for a quick and simple Valentine this year? How about these bumblebee, be (or bee!) mine Valentines. Want the how to? Keep on reading...
I used some tags that I had leftover from my thumbprint snowmen tags that I made for Christmas. I think these would look great on standard office supply tags too. I mixed some yellow paint, with just a touch of orange paint, just to make the yellow a bit darker. Claire went to town stamping her thumbprints on the tags. After Claire was in bed that night, I used a red pen to draw on the heart at the top of the tags. I also wrote be mine. Claire just started writing her letters so she probably would have taken up this whole tag to write those words!

When Claire woke up the next morning she was anxious to finish drawing the bumblebees. She drew on their strips and faces. Together, we drew on the wings. I attached some twine to the tags and we were done!

Pass out these sweet Valentines this year!

Monday, January 9, 2012

thumbprint Valentine Day bookmarks

 Valentine's Day is just around the corner. We're getting a head start on our projects this year, mostly because Claire loves working on new 'projects'. Switch it up this year and hand out little Valentine Day bookmarks. These were quite easy to make- and you probably have all of the supplies on hand right now. Paper, paint, markers and googly eyes (optional). Go ahead, go check for them. I'll wait right here. 

 Claire loved drawing all the faces and gluing the eyes on the animals. And the back of the bookmark is the perfect spot to write a little message to your special Valentine.

 I cut all of the paper before Claire and I sat down to start this craft. I used 12 x 12 paper. I cut it in half, and then cut two inch strips (so the bookmarks are 6 x2). I did use my corner punch to round the corners of the bookmarks, but obviously this is a very optional step. Using my hole puncher I punched the hole for the ribbon.
 Using brown paint Claire stamped her thumbprint. Once it was dry, we used a brown marker to draw the ears. I used my hole puncher to punch some holes from cream coloured paper for the nose of the bear. Claire glued on the eyes.
 The lion was the easiest of all of the bookmarks. I mixed a little bit (and I mean tiny bit) of orange paint with the yellow paint so that it would look more lion-y (I know that's not a word.) Draw on the mane, and mouth, and glue on the eyes.
 We used red paint for the bird, and then used an orange marker for the comb and legs. A black marker for the smile, and then we glued on googly eyes.
I mixed a bit of the purple paint with white paint so that we'd have a lighter shade of paint for the top wings. Once the paint was dry we used a grey marker to draw the body of the butterfly and the antennas. We added a smile with a red marker, and glued on googly eyes.
 After Claire stamped her thumbprint with the white paint, she dipped her pinky finger in the white paint to stamp the ears. Once it was dry, we used a pink marker to colour in the ears, and draw the nose. We used a black marker for the smile and whiskers. Googly eyes finished it off.
 Stamp the frog using green paint. Once it's dry use a green marker to draw the legs and the round balls behind the eyes. Use a black marker to draw the nose and smile. Glue the googly eyes on top of the frog.

Show me what you're making for Valentine's Day. Link it up in the comments. 


Monday, December 19, 2011

thumbprint snowmen ornaments


 Now here's a craft that only takes about 15 minutes to do! (Minus drying time of course.) I picked up these ornaments at Michael's a little while ago with this craft in mind. I used some heavy vellum paper for this craft. I traced a circle slightly smaller than the ornament on the vellum and then cut out a bunch of circles for the kids to stamp their thumbprints on.

 We made two white circles for the snowmen, and then another colour thumbprint for the snowman's hat. Once the snowmen were dry Claire and I drew on the faces and buttons. (Not pictured here: the snowmen that Claire thought should have scary faces. Where does she get this from?)

I made this a double sided ornament by placing a small piece of double sided tape in between two pieces of vellum. Then just roll up the circle and slide it into the ornament. I am so happy with how these ornaments turned out- what a lovely keepsake ornament to have for years to come! To see similar ornaments that we made last year click here.
Linking up with: Tip JunkieTatertots and Jello
Related Posts Plugin for WordPress, Blogger...